Now that I have a job lined up for July, it's about time to start getting things ready for my classroom!
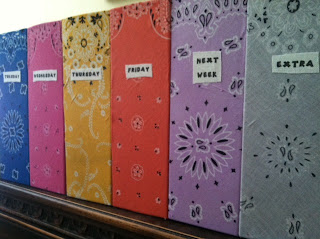
To start, I made some neat looking fabric covered paper organizers.
This project was not necessarily a mandatory one, but I think that it will make my desk look just a little bit nicer.
Supplies:
- Plastic Paper Bins
- Colorful Fabric (I used bandannas)
- Spray Glue (Loctite- High Performance)Optional:
- White Fabric
- Freezer Paper
- Printer and Ink
Luckily for me, I had all the supplies for this project on hand and did not need to spend a dime on it.
I found the colorful bandannas in the fabric closet and acquired a set of 7 plastic bins from my aunt.
The first step for this project is to make sure that the fabric you are using will cover the bins completely.
It took me a while to find the right way to fold the bandannas, but I eventually worked out the best method for me. You can wrap your bins in whatever way you want, but I'm going to explain how I did it.
After determining that the fabric would fit, I sprayed the back of the plastic bin with glue and stuck it to the fabric.
Notice that my fabric is turned and the top point lines up with the top of the bin.
Notice that my fabric is turned and the top point lines up with the top of the bin.
*Make sure to work any creases or bubbles out of the fabric before moving on to the next step*
Next, I sprayed one side of the bin with glue and wrapped the fabric across the side and around to the front.
I glued the corner of the bandanna down to the front of the bin as well.
*Make sure to work any creases or bubbles out of the fabric before moving on to the next step*
I then repeated this with the other side of the bin: glue, wrap, and smooth.
I did not want the front point of the bandanna to wrap around to the left side, so I folded that under before gluing the point down.
This left me with a gaping hole in the bottom and a flap on either side.
I then took those two flaps and neatly folded them up along the sides, holding them in place with the spray glue.
The last step was to glue the excess fabric from the top of the bin.
I had to cut a slit in the fabric at the front of the bin in order for it to fold over neatly.
Then I sprayed a layer of glue along the top inside edges, and gently folded down the remaining fabric.
I repeated this 7 times with different colored bandannas.
Here is where you can stop and use the bins (after letting them dry, of course), but I took mine a step further.
I wanted to label each of the bins, so I went online and researched how to print onto fabric.
I found this awesome tutorial: Inkjet Printing on Fabric
It's a pretty simple task:
First, iron freezer paper onto the back of a piece of fabric.
Next, cut the fabric/freezer paper combo down to an 8 1/2" by 11" sheet
Finally, put the fabric/freezer paper combo in the printer and print.
I used this method to make these sweet labels.
I cut out each word from my labels, and used spray glue to attach one to each side of each of the bins.
And there you have it... some organizational tools that aren't all boring and grey.
I can't wait to put these in my classroom! (But maybe I'll leave the wine at home.)

.jpeg)

.jpeg)
.jpeg)
.jpeg)
.jpeg)
.jpeg)
.jpeg)
.jpeg)
.jpeg)
.jpeg)
.jpeg)
.jpeg)

.jpeg)
No comments:
Post a Comment